Making A Synth With Python — Modulators

As I was writing this, I realized that there maybe too many lines of code in this post, but then I remembered the Linus Torvalds quote: “Talk is cheap. Show me the code.”, so this one’s for the code loving inquisitive coders out there.
If you don’t like the code, just look at the diagrams and listen to the samples I guess… Or think of this as documentation in prose or something…
Before We Start
If you’ve found yourself here without context, it’s a part of a series on making synthesizers, the first part deals with oscillators, this post uses components described in the previous post.
This is the kind of sound we’re gonna create in this post 👇
Note : Most samples are in stereo, use earphones or headphones to hear both the sides better.
Before I start of there are a few general terms I throw around in this post
- Generator — anything that will generate a signal (series of numbers) for the purpose of playback, like an oscillator.
- Modulator — anything that modulates the signal of a generator by generating its own sequence of notes, it maybe a generator itself.
- Modifier — anything that modifies the signal of a generator but doesn’t generate its own signal to do so.
Other than these three there are combinations such as modulated modulators which are modulated modulators that may be used on generators, and modulated generators which are modulated generators, I tend to refer to these also as generators , goes without saying that both are kinda self explanatory. There can also be modulated variants of modifiers, modulated modifiers. If this all is confusing, don’t worry, it will make sense.
Envelopes 💌
An envelope is a type of modulator this can be used to modulate any parameter of sound, here we’ll use it to modulate the oscillator parameters.
In the previous post, the oscillators were operated with constant parameters (amplitude, frequency and phase); using envelopes we can shape the parameters to mimic real instruments or surreal instruments.
The most simplest envelope, an ADSR envelope has 4 stages, below I have explained them in the context of volume.
- Attack : the time taken for a note to go from 0 to full volume. Example : for plucked and percussive instruments this time taken is instant, but say for something like a theremin, the rise to full volume can be much slower.
- Decay : the time taken to reach the sustain level. Example: for percussive sounds the decay is instant, i.e. these are transient sounds, instant high amplitude for a very short amount of time.
- Sustain : the level at which a note is held. Example: for acoustic instruments the sustain will have decreasing amplitude which is why, on the piano, the note will eventually die out. On electric guitars we can have infinite sustain by using cool contraptions such as ebows or sustainer pickups. Digital instruments, unconstrained by physics, can have infinite sustain.
- Release : the time taken for the note to die out after it’s released. Example: when the finger is raised off of a piano key the volume doesn’t instantly drop to zero.
So to create an envelope we need 4 numbers that make it’s parameters: attack, decay and release times and sustain level.
If we know the sustain length then creating the values of the envelope is pretty simple with numpy.
attack = np.linspace(0, 1, attack_length)
decay = np.linspace(1, sustain_level, decay_length)
sustain = np.full((sustain_length, ), sustain_level)
release = np.linspace(sustain_level, 0, release_length)
Here [stage]_length is the number of samples in that stage, i.e. sample_rate * time_taken.
And if you were to plot it then this is how it would look

This is pretty simple but there are some complications:
- We don’t know the length of the sustain stage, a note can be held for any amount of time.
- The release stage is triggered only when the note is released, so we’ll need a way to indicate that.
- The note can be released at any point, i.e. the envelope can be in the middle of the attack or decay stages when the note is released, so we need to keep track of the current value of the envelope to calculate the release values.
Since the attack, decay and release parameters don’t change, we can generate these values and store them. Or we use itertools.count to increment and decrement the values as required. Since this is a post about lazy iteration and not memoization, I'll go with the latter approach, this also means that if the attack is like 2 minutes long, the envelope won't get stuck generating like a hundred MB of values and storing it in memory.
Since we will be using itertools.count we need a step size, which here would be the reciprocal of the number of samples in a stage.
And depending on whether it is in the attack stage, or in either of the release or decay stages, the step will be positive or negative respectively. Sustain is constant so we can use itertools.cycle for this.
attack_stepper = itertools.count(0, step=1/attack_length)
decay_stepper = itertools.count(1, step =-(1 - sustain_level)/ decay_length)
sustain_stepper = itertools.cycle([sustain_level])
release_stepper = itertools.count(sustain_level, step =-1/ release_length)
Note : I’m calling them steppers cause they are stepping through the values of the envelope.
The above steppers will step infinitely, but we have to switch between them at specific points:
- Attack stepper should stop when amplitude reaches 1.
- Decay stepper should stops when amplitude reaches the sustain level.
- Sustain stepper should stop when the note is released.
- Release stepper should stop when amplitude reaches 0.
For the first 3 steppers we can create a generator function. But it wouldn’t suffice to take into account the third point and switch to the release_stepper, and also there needs to be some indication of when release stage has ended.
All this additional functionality is better handled if we wrap it all up in a class that can maintain the envelope state.
⚠️ Incoming code block!
The above class takes care of all the required functionalities.
- The
get_ads_steppergives us a generator function that generates values for the attack, decay, and sustain stages and theget_r_stepperreturns a generator function for the release stage. - The switch from any stage to release takes place when
trigger_releaseis called, all it does is swap out the stepper that is being used i.e.get_ads_stepperto theget_r_stepperwhich returns the release values. - Also there is a flag
endedthat indicates the end of the release stage, this is needed cause even after the note has been released usingtrigger_releasewe need it to play until the release stage has ended.
The idea behind the ADSREnvelope class is that, when a note is pressed/played/activated __iter__ is called on it, and when it's released trigger_release is called. The envelope steps through all of the values by calling __next__ on it until ended is set to True, i.e. it is an iterator similar to the Oscillator classes from the previous post.
If we were to apply the above envelope to a 110 HZ square wave, this is how it would look:

Note : For visualizing the waveforms I’ll mostly be using square waves cause of their parallel line induced visual aesthetics.
Applying the envelope to the amplitude is pretty easy we just need to multiply the values of the envelope to those of the oscillator. But that’s all we can do.
What we need, is a component that will help us attach an envelope to any of the 3 parameters of the oscillator.
Modulated Oscillator 🧶
The ModulatedOscillator will be a modulated generator, it will have a generator which in this case is an Oscillator and a modulator which can be an ADSREnvelope.

The main point of the ModulatedOscillator is that it should allow us to modify the amp , freq, and phase parameters of the Oscillator.
The ModulatedOscillator class would take these arguments:
oscillator, the wave generator whose output values will be modulated.modulatorswhich is a list of at most 3 modulators such as an instance of theADSREnvelopeclass.- The mod functions:
amp_mod,freq_mod, andphase_mod, these tell themodulatorshow to modulate theoscillatorvalues.
A modifier function ([parameter]_mod) will be called in _modulate, it will take the value from one of the modulators (by calling its __next__) and the original value of the parameter from the oscillator and returns a new value to be applied to the parameter, this will update oscillator‘s internal state to reflect the new parameter values.
Examples of mod functions:
amp_mod: For the oscillator amplitude it’s pretty simple, we just multiply the valuesfreq_mod: For frequency, we need to apply the envelope by only a small percent, this will be set by themod_amtparameter, and thesustain_levelparameter is so that when the note is in the sustain stage, it plays it’s actual frequency.phase_mod: For phase we can use the same function asfreq_mod.
A few design considerations of the ModulatedOscillator that allows us to go wild with sound composition experimentation:
- The modifier functions can be anything, you can even chuck in a
math.tanin there somewhere; this is the crazy thing about programming a digital synthesizer, one is not limited by hardware or prior norms. - The argument
modulatorscan be any kind of generator, even an object of theModulatedOscillatorclass itself can be used, so a modulator can modulate another modulator, which gives us modulated modulators. - Separate modulators can be set for each of the three parameters which is why the class takes in a list of
modulatorsrather than a single one. - It also has a
trigger_releasewhich can call themodulators’trigger_releasei.e. if one of themodulatorsis anADSREnvelope, similarly it also has the propertyendedto indicate the end of release.
Now instead of using an Oscillator directly we'll be defining ModulatedOscillators and calling __iter__ and __next__ on them to initialize and generate the values.
Viewing the ADSRed Waves 👀
Just by modulating the ADSR values and applying it to the oscillator amplitude using the mod_amp arg we can have different kinds of sounds.

The first and the third wave forms have no sustain or release only attack and decay which have contrasting durations.
For all the above three waveforms, a 55 Hz (an A1 note) Square oscillator has been used.

This is what applying the ADSR to frequency and amplitude gets us, I used the same envelope for both frequency and amplitude and the functions used are the ones defined above in the param_mod.py gist embed.
You can see that the oscillations are rarified at the start and at the end of the note, only during the sustain stage does the waveform have a frequency of 110 Hz. As the amplitude crosses the sustain level in the attack stage, the frequency goes higher than 110 Hz then it comes back down again in the decay stage.
This 👇 is how the plotted wave would sound like.
LFO 🪡
Low Frequency Oscillator, that’s the next component, another kind of modulator like the envelope; as the name suggests, it’s an oscillator that generates signals at a low frequency that’s generally infrasonic (< 20 Hz) and these signals are used for modulating different aspects of sound.
Example, if an LFO is applied to the amplitude you get a tremolo effect, i.e. AM (amplitude modulation); if it’s applied to the frequency you get a vibrato effect, i.e. FM frequency modulation; if it’s applied to the cutoff frequency of a low pass filter then you get a wub-wub.
Now here’s the awesome thing, there’s no need for any new components, the ModulatedOscillator and the different subclasses of Oscillator that were coded in the previous post are all the components needed for an LFO.
Amplitude Modulation 📻
We have already been modulating amplitude but earlier it was by using an ADSR envelope, now we are gonna modify amplitude by using oscillators.
The LFO values shouldn’t go into negative (unless you want it to) cause that’ll cause phase inversion, so we can restrict the values by using the wave_range parameter, this will allow us to set the min and max values which by default for all the oscillators are between -1 and 1.
The code to create an LFOed wave generator is pretty simple:
gen = ModulatedOscillator(
    SquareOscillator(freq=110),
    SineOscillator(freq=5, wave_range=(0.2, 1)),
    amp_mod=amp_mod
)
This is what the LFO wave, the main oscillator wave and the modulated wave look like:
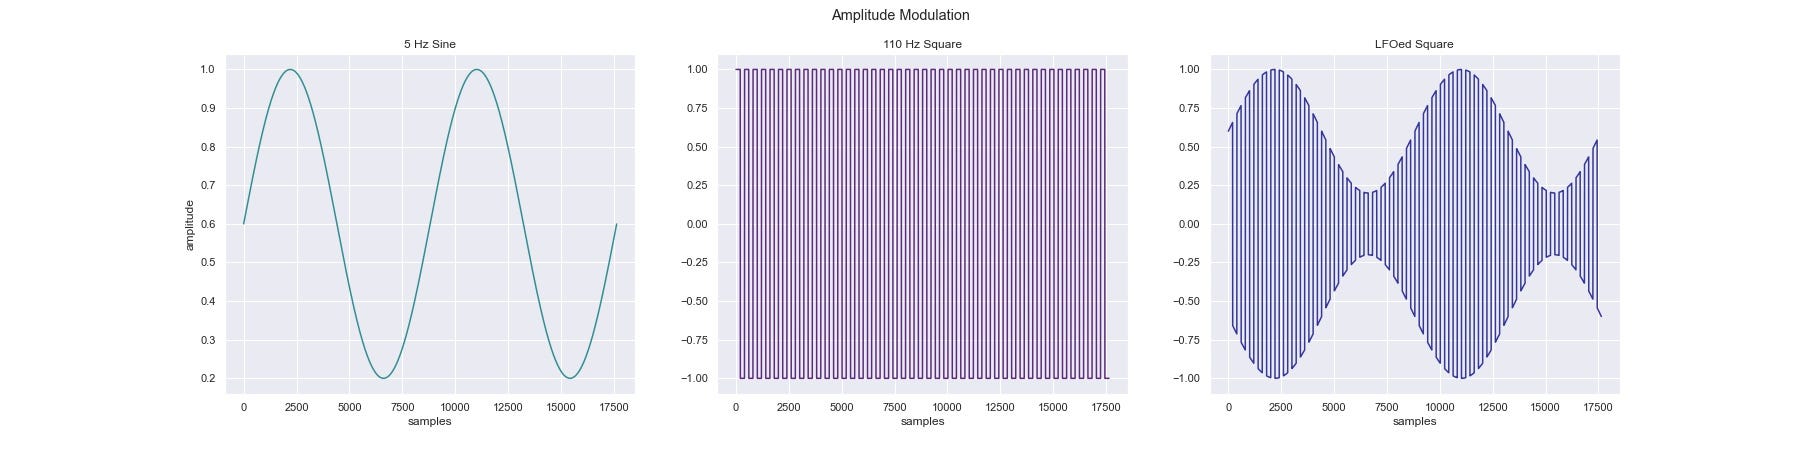
How the AM wave sounds👇
Frequency Modulation 📡
For FM, similar to AM, we just need to multiply the value of the LFO with the initial frequency of the oscillator, because of the oscillator design the correct step size is automatically calculated.
One small difference is that we’ll be changing the modulating function freq_mod to use something much simpler than what we had used earlier with the ADSREnvelope.
def freq_mod(init_freq, val):
    return init_freq * val
This function is the same as the earlier used amp_mod function. The reason why we don’t need to use the earlier function is cause we can control the modulation amount at the oscillator level by using wave_range.
Similar to amplitude modulation, the code for frequency modulation is pretty simple:
gen = ModulatedOscillator(
    SquareOscillator(freq=110),
    SawtoothOscillator(freq=5, wave_range=(0.2, 1)),
    freq_mod=freq_mod
)
Main difference is the use of freq_mod instead of amp_mod.
This time I used a sawtooth for the modulation, here’s how it looks ⬇️

And here’s what it sounds like; ⚠️ it’s a bit uncomfortable sounding.
We have all the main components, we need some composer components to help us compose some sounds.
Composing Sounds 🧩
In this section I’m gonna define a few components that will help us to combine the previously defined components i.e. Oscillator, ADSREnvelope and the ModulatedOscillator to design some crazy sounds.
These may also give you ideas on how to go about creating new components to design and combine sounds.
Remember the WaveAdder from the previous post, we’re gonna modify it a bit so that it can be used with modulated waves. But before that I'm gonna introduce another component.
The Panner 🍳
This will help us split mono inputs to stereo outputs, this component is a wave modifier.
All the Panner does is take an input value and return two values for the left and the right channel, the objects of the Panner will be used as a function, which is why the __call__ is implemented.
It has just one parameter, r which is the half of the right side amplitude, r would have a value between 0 and 1, 0.5 means center, 0 means 100% left panned and 1 means 100% right panned.
When a wave is panned to a side, it just play less loudly on the other side; here’s ↓ a wave that has been panned 40% to the left, i.e. r is set to 0.3.

If you are wondering why the amplitudes go from -2 to 2, it’s cause the sum of both the sides after panning is 2 and so the mean of both the channels comes up to 1.
Now that we have a panner we can make sounds like this 👇, where a 440 Hz triangle wave is being panned between left and right every 4,000 samples (~90 ms), If you’re listening through just one side it’ll probably just sound like a stutter effect. If both the channels are combined then it’ll sound like a normal wave.
Now that the Panner is done with, let's recode the WaveAdder, but before that, we need a component that will help us use components like the Panner in a sensible way.
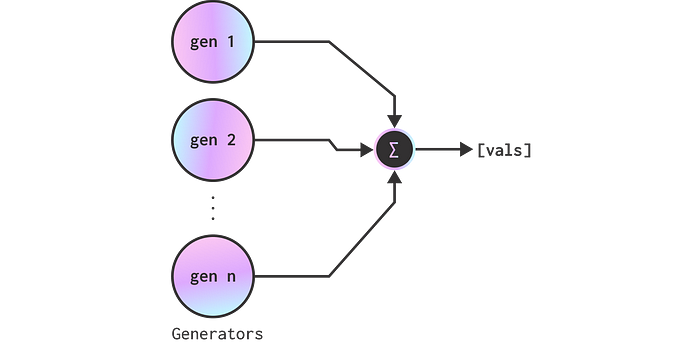
The Chain ⛓
The Chain component, this will help us have a single generator which here can be a modulated generator and multiple signal modifiers such as the Panner which are used as a function after that, i.e. it will allow us to chain modifiers, you can think of this component as a composer component.

This diagram ⬆️ should help make sense.
Python has for ... else ... blocks, neat huh?!
This component will allow us to chain multiple other components like so
osc = Chain(
    SineOscillator(),
    Panner(r=0.35)
)
and then call __next__ and __iter__ on the generator through its own implementations. It will also allow us to access the generator and modifier parameters, for example osc.r will give us the right side pan value (0.35) from the Panner object, this is cause we have overridden the __getattr__ function. But since this returns only the first value it finds we still have to code trigger_release and ended.
Now we can recode the WaveAdder.
The WaveAdder ➕
WaveAdderThe WaveAdder is another composer component like the Chain, but instead of combining components sequentially, it combines them parallely.
Some design details
- The new
WaveAdderwill help us trigger the release stage usingtrigger_releaseof any of the underlyinggeneratorswhich could be aModulatedOscillatorobject or aChainobject or whatever. It will also allow us to check theendedflag if there is one present. - Along with that we can run the WaveAdder in stereo or mono using the
stereoargument.
We can now compose waves sounds in this way
gen = WaveAdder(
    ModulatedOscillator(
        SineOscillator(hz("A2")),
        ADSREnvelope(0.01, 0.1, 0.4),
        amp_mod=amp_mod
    ),
    ModulatedOscillator(
        SineOscillator(hz("A2") + 3),
        ADSREnvelope(0.01, 0.1, 0.4),
        amp_mod=amp_mod
    ),
    Chain(
        ModulatedOscillator(
            TriangleOscillator(hz("C4")),
            ADSREnvelope(0.5),
            amp_mod=amp_mod
        ),
        Panner(0.7)
    ),
    Chain(
        ModulatedOscillator(
            TriangleOscillator(hz("E3")),
            ADSREnvelope(0.5),
            amp_mod=amp_mod
        ),
        Panner(0.3)
    ),
    stereo=True
)
Note : The hz(note) function is basically librosa.note_to_hz(note) from the librosa library, this will return the numeric frequency of the entered note.
See the A2 notes in the bass, they share the same ADSREnvelope and it is applied to the volume, the same goes for the E3 and C4; to make things simpler we should create a component that can be added into Chain to control the volume of all the previous inputs.
The ModulatedVolume 🔉
Before that a simple Volume component.
The above Volume component is a simple volume control that can be inserted into the chain after a generator, it will just scale the amplitude of all inputs by amp. This is another example of a modifier.
We can create a modulated version of the Volume component, i.e. a modulated modifier.
The above ModulatedVolume component takes as an arg a modulator such as the ADSREnvelope, this will be used to set the internal amp on calling the ModulatedVolume’s __next__.
The above sound composition can be rewritten like so:
gen = WaveAdder(
    Chain(
        WaveAdder(
            SineOscillator(hz("A2")),
            SineOscillator(hz("A2") + 3),
        ),
        ModulatedVolume(
            ADSREnvelope(0.01, 0.1, 0.4),
        )
    ),
    Chain(
        WaveAdder(
            Chain(
                TriangleOscillator(hz("C4")),
                Panner(0.7)
            ),
            Chain(
                TriangleOscillator(hz("E3")),
                Panner(0.3)
            ), stereo=True
        ),
        ModulatedVolume(
            ADSREnvelope(0.5)
        )
    ),
    stereo=True
)
Here ☝️ we have the same wave generator rewritten with the ModulatedVolume component, this allows for shared envelopes between generators. The design of a wave generator is nested, and the core components (i.e. in the innermost nest) are the different oscillators.
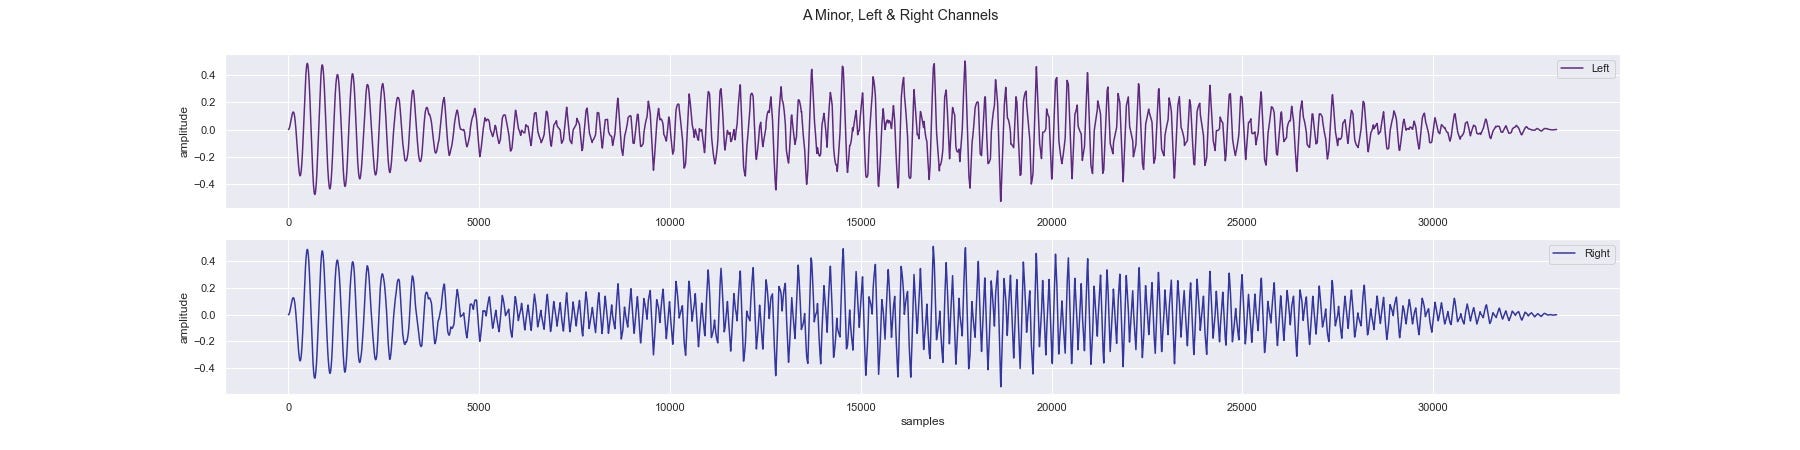
Here’s ☝️ how the wave looks, you can see that the right has higher frequencies this is cause of the C4 which is panned right, and the left side has the E3 the lower note. Also initially the oscillations are low, this is cause the C4 and E3 have much slower attack times than the A2.
This is how it would sound, it’s an A minor chord. Kinda morose sounding!
Similar to how we made a modulated variant of the Volume component we can have other similarly modulated components.
The ModualtedPanner 🥘
We can apply a generator such as an Oscillator to other components, for example a Panner to get a ModulatedPanner this is similar to the design of the ModulatedVolume.
The ModulatedPanner uses a modulator that returns a value between -1 and 1 such as the Oscillator. Using this we can get waves that sound like as if it’s rotating in your head (if you are using headphones or earphones).
The wave composition code:
gen = Chain(
    SineOscillator(220),
    ModulatedPanner(
        SineOscillator(4, wave_range=(-0.8,0.8))
    )
)
This is how it looks 👇
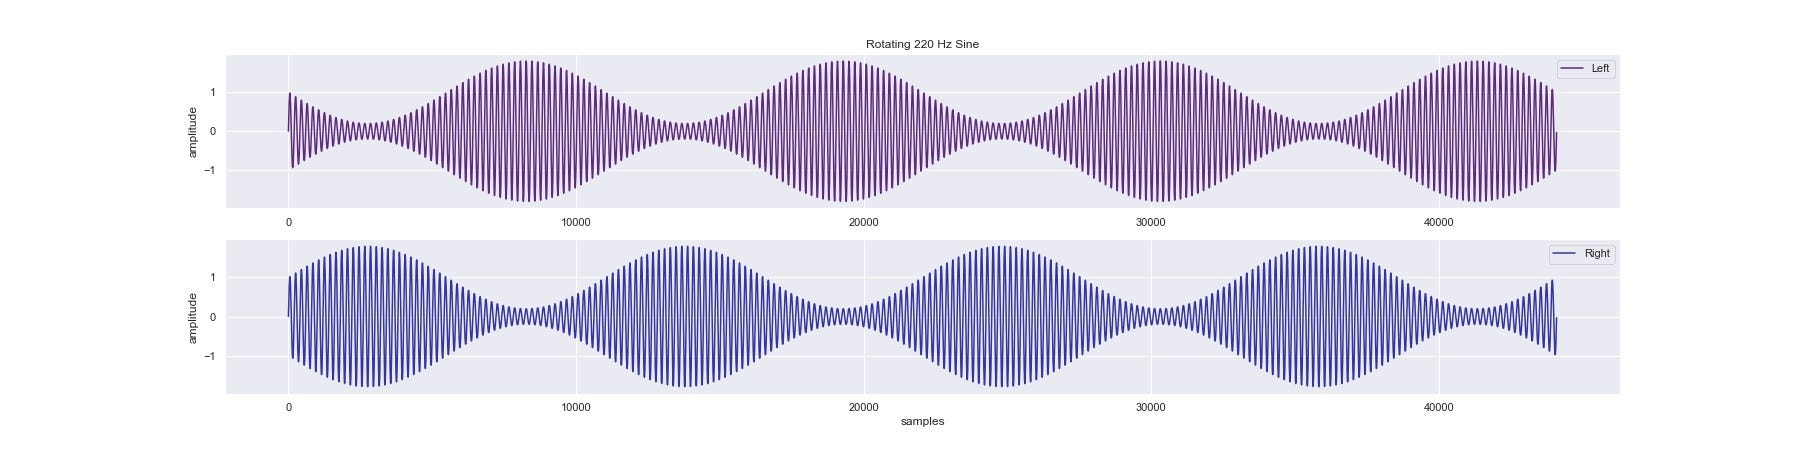
And this is what it sounds like ⬇️
Wave Composition Examples 🎼
A few examples of more complex wave compositions than the ones above, these are composed and generated using the previously coded components.
Rotating Chords 🌪
Since the ModulatedPanner makes use of an Oscillator we can use the phase parameter to have "rotating chords".
gen = WaveAdder(
    Chain(
        TriangleOscillator(freq=hz("C4")),
        ModulatedPanner(
            SineOscillator(freq=3, wave_range=(-1,1))
        ),
    ),
    Chain(
        SineOscillator(freq=hz("E4")),
        ModulatedPanner(
            SineOscillator(freq=2, wave_range=(-1,1))
        ),
    ),
    Chain(
        TriangleOscillator(freq=hz("G4")),
        ModulatedPanner(
            SineOscillator(freq=3, phase=180, wave_range=(-1,1))
        ),
    ),
    Chain(
        SineOscillator(freq=hz("B4")),
        ModulatedPanner(
            SineOscillator(freq=2, phase=180, wave_range=(-1,1))
        ),
    ),
    stereo=True
)
Here’s a C Major 7, with the C and the E starting off in the left ear with a panner phase of 0° and 2 different panning frequencies, 2 and 3 Hz and the G and B starting of in the right with a panner phase of 180° and 2 different frequencies, the wave has a rhythm to it cause of the different panning frequencies.
You can kinda make sense of what’s happening by listening to both the sides in isolation from each other.
Acceleration-Deceleration 💫
This wave sounds like it’s accelerating in one ear and decelerating in the other.
gen = Chain(
    WaveAdder(
        Chain(
            ModulatedOscillator(
                SineOscillator(freq=hz("A4")),
                ModulatedOscillator(
                    SineOscillator(freq=20),
                    ADSREnvelope(0, 4, 0),
                    freq_mod=amp_mod
                ),
                freq_mod=freq_mod
            ),
            Panner(r=0)
        ),
        Chain(
            ModulatedOscillator(
                SineOscillator(freq=hz("A4")),
                ModulatedOscillator(
                    SineOscillator(freq=20),
                    ADSREnvelope(4),
                    freq_mod=amp_mod
                ),
                freq_mod=freq_mod
            ),
            Panner(r=1)
        ),
        stereo=True
    )
)
This is cause of the inverted ADSR envelopes applied to the frequency of the modulating oscillator that is modulating the frequency of the main oscillator, kinda confusing, this is how it sounds:
The above two examples should give you an idea of how all the components can be used to make different kinds of sounds, for the next post we’ll try and make a playable synth 🎹.
Link to the first post on Oscillators.
Link to the third post on Controllers.
The updated code is in this repo, and the code for generating all the plots and waves is in this notebook, ⚠️ it’s a bit spaghetti like 🍝.
If any synth pro is reading this and I have butchered any of the synth components, please lynch me or cordially correct me in the comments.
Thanks for reading. 🖖